
How to Upgrade Your Keep2Share Account
Upgrading your Keep2Share account to a premium plan unlocks a host of benefits, including faster download speeds, increased daily limits, an ad-free experience, and enhanced security. The process is straightforward and designed to be user-friendly. This guide will walk you through the typical steps involved in upgrading your Keep2Share account.
Step-by-Step Guide to Upgrading Your Account
While the specific layout and terminology on the Keep2Share website may undergo minor updates, the fundamental steps for upgrading your account remain consistent. Follow these instructions to seamlessly transition to a premium membership:

The first and most crucial step is to access your existing Keep2Share account. Open your web browser and navigate to the official Keep2Share website. Locate the “Login” or “Sign In” button, typically found in the top right corner of the homepage. Enter your registered email address or username and your password into the respective fields. If you are a new user and do not yet have an account, you will need to complete the registration process before proceeding with an upgrade. Registration usually involves providing a valid email address, creating a password, and agreeing to the terms of service.
Step 2: Locate the Upgrade Options

Once you have successfully logged into your account, you will need to find the section dedicated to premium plans or upgrade options. Keep2Share generally makes this process intuitive, with clear calls to action. Look for prominent links or buttons that are labeled with phrases such as “Upgrade,” “Premium Plans,” “Buy Premium,” “Go Premium,” or similar. These links are commonly positioned in highly visible areas, including:
- The main navigation bar or header: Often, a direct link to premium plans is included in the primary menu at the top of the page.
- The user dashboard or account settings: After logging in, you might be redirected to a personal dashboard where upgrade options are readily available.
- Promotional banners or sidebars: Keep2Share may display banners or sidebar advertisements encouraging users to upgrade, which will also contain clickable links.
Clicking on any of these options will typically lead you to a dedicated page outlining the various premium subscription tiers.
Step 3: Choose Your Desired Premium Plan
On the premium plans page, you will be presented with a selection of different subscription tiers, each offering varying levels of features and benefits. Keep2Share typically provides options such as “Premium,” “Premium Pro,” and “Premium Max.” Carefully review the details of each plan to determine which one best aligns with your downloading and file-sharing needs. Consider the following factors:
- Daily Download Limit: This is a critical factor, especially if you frequently download large files or multiple items. Premium plans offer significantly higher daily limits compared to free accounts.
- Download Speed: Premium accounts remove speed restrictions, allowing you to download at the fastest possible rate your internet connection allows.
- Exclusive Features: Some plans may include additional features such as video streaming capabilities, download accelerators, simultaneous downloads, or priority customer support.
- Pricing: Compare the cost of each plan to your budget. Remember that longer subscription durations often come with a lower effective monthly rate.
Select the plan that offers the optimal balance of features and cost for your usage patterns.
Step 4: Select Your Subscription Duration
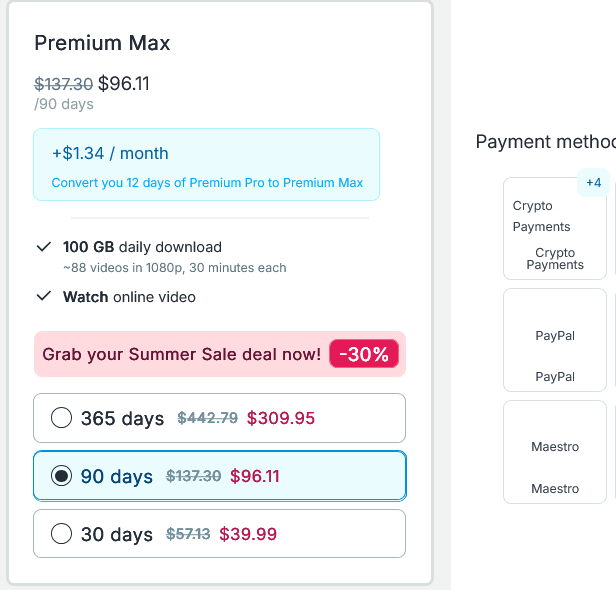
You can upgrade your current Premium Pro plan to Premium Max. Your remaining time will be converted to Max, and with just a small monthly addition, you’ll unlock even greater benefits and enjoy the full power of Max.
After choosing your preferred premium plan, you will typically be prompted to select the duration of your subscription. Keep2Share usually offers several options, such as:
- Short-term plans: (e.g., 30 days, 60 days)
- Mid-term plans: (e.g., 90 days, 180 days)
- Long-term plans: (e.g., 1 year)
Opting for a longer subscription duration often results in a more cost-effective solution in the long run, as the per-month price tends to decrease with extended commitments. Consider your anticipated usage and budget when making this decision.
Step 5: Proceed to Payment
Once you have selected your plan and duration, the next step is to proceed to the payment section. Keep2Share supports a variety of secure payment methods to ensure a convenient transaction. Common payment options include:
- Credit/Debit Cards: Visa, MasterCard, American Express, and other major credit/debit cards are widely accepted.
- PayPal: A popular and secure online payment system.
- Other Online Payment Gateways: Depending on your region, Keep2Share may also support other local or international payment services.
- Cryptocurrency: Some platforms are beginning to accept cryptocurrencies as a payment option.
Choose your preferred payment method and carefully enter all the required payment details. Ensure that all information is accurate to avoid any processing delays.
Step 6: Complete the Purchase and Activate Your Premium Account
The final step involves confirming your purchase and completing the transaction. Before finalizing, you may be asked to review your order details, including the selected plan, duration, and total cost. Once you confirm, follow the on-screen prompts to complete the payment process. This may involve redirection to a secure payment gateway or a confirmation page.
Upon successful completion of the payment, you will typically receive an email confirmation of your purchase. More importantly, your Keep2Share account will be automatically upgraded to the selected premium plan. You should immediately notice the benefits, such as increased download speeds and access to premium features, without any further action required on your part. You can verify your premium status by checking your account dashboard, where your current plan and its expiry date should be displayed.
Troubleshooting Common Upgrade Issues
While the upgrade process is generally smooth, you might encounter occasional issues. Here are some common problems and their potential solutions:
- Payment Failure: Double-check your payment details, ensure sufficient funds, and try a different payment method if necessary. Contact your bank or payment provider if the issue persists.
- Account Not Upgraded: If your account status doesn’t reflect the upgrade immediately after payment, wait a few minutes and refresh the page. If it still doesn’t update, contact Keep2Share customer support with your transaction details.
- Website Errors: If you encounter any technical errors on the website, try clearing your browser’s cache and cookies, or try using a different browser.
Conclusion
Upgrading your Keep2Share account is a simple and effective way to significantly enhance your file-sharing experience. By following these steps, you can easily select the premium plan that suits your needs and unlock a world of faster downloads, greater flexibility, and a more secure environment. Enjoy the full potential of Keep2Share with your new premium membership.
Last Update: 03 September 2025 - 10:46
533